
I purchased the Yaesu FTDX 3000 a few months ago. When I bought it, I knew that it was a pretty menu-intensive machine. I'm a button-tweaker, and knob-fiddler. I'm not as fond of menus, but if they're there, I try to learn whatever I can to help me pull out the weak DX stations. I'm also an SSB person -- not CW -- but once you learn how many of these tweaks work, you can employ them as you like with CW signals.
I sold my Icom 7300 to get this radio, partly because I was not satisfied with the 40m performance of the 7300. The 7300 is an excellent high-band radio, but it doesn't handle general city noise well on the low bands, and quickly becomes overloaded if you have a lot. I'm not talking about the Noise Blocker, which is very good on the 7300 -- I'm talking about the plethora of lights, electronics, and noise-producing items that attack the radio's front-end when you're in a large multi-story urban environment such as Seoul, Korea. Even with attenuation activated, the 7300 whimpers home and cries to mama, losing faint signals in a dithered mess of hiss. Despite IP+ activated, I was disappointed on the low bands, couldn't hear 40m stations in California (from Seoul), and was unhappy.
I purchased an FTDX 3000 because a ham friend, HL5ZEE, already had one. I was wowed specifically by the noise reduction capabilities of his 3000. I had also owned a Yaesu FT-891, which had impressive Noise Reduction. I have a review of the FT-891, if you're interested, but it's long gone from my shack. The Icom 7300 has Noise Reduction, but I didn't find it particularly impressive. Oddly, I've learned since getting and tweaking with the FTDX 3000, that I rarely need/use the Noise Reduction at all!
Enough background -- let's talk about how to improve signals with the FTDX 3000.
 First off, I should mention that I purchased the 3000 along with a Yaesu MTU-80/40 external RF Tuning Unit. That external box is worth a whole nother review, which will be upcoming. To keep it short -- 98% of hams won't benefit from the MTU units, unless they have an older Yaesu series radio that it works with, or if they live near overpowering broadcast towers or large ham stations. If that's not you, then save your money. I thought it might help me in my large city noise environment. The answer -- kinda sorta -- but not enough to spend $375 on it used, and certainly not enough to spend $700+ for a new one. The FTDX 3000 has enough attenuation and tricks that the MTU doesn't do as much as it would for, say, and FT-950 or FT-2000.
Enough said on that.
The RX tips and tweaks ...

Before I go there, as with other Yaesu radios, you should learn how to use the IPO, Amp1, and Amp2 settings under the white IPO button. Using the Amp (and ATT button) are not tricks, but common good radio practice to learn, and they apply to almost any radio. If signals are coming in strong, especially on lower bands, using IPO will mean a cleaner signal. To keep it simple, if you are in IPO, your Amp is off. Adding amplification can pull out weaker signals, but does add a bit of noise. On the FTDX 3000, I find I adjust these per how they make my waterfall look, so that signals appear just comfortably viewable, there. I add amplification on higher bands to pull out a weak signal, or weaker overall signals.
Attenuation is also useful, via the white ATT button. Attenuating a hot band will help remove some noise, and keep signals at a comfortable level. Play around with the ATT on a hot band, and see where you like it. Use it in conjunction with the RF Gain, as outlined in Trick #8, below.
Trick #1: Menus 099-102
These settings allow you to add a low or high cut to the received audio signal. They may seem similar to the WIDTH knob function, which can be affected by these, but they're not the same. Cutting the top or bottom of the 099 SSB LCUT and 101 SSB HCUT are really useful if you want to reduce hiss on a noisy day, or lay the foundation to pop-out a tight little DX signal. You can also widen them out, if you want to listen to a really beautiful eSSB signal as wide as 4000hz. Play around with them, but removing unnecessary low rumble and high hiss noise are some of the first tweaks I make on a DX signal, as I try to reel them in. I usually leave them on default, or wider than default, until I start hunting for DX.For example, if I hear a DX signal with a thin, compressed voice to punch through the noise, I might end up with settings like this to clear hiss above and below the signal:

You'll also note that there are settings like 100 LCUT SLOPE and 102 SSB HCUT SLOPE, where you get a choice between 6dB/oct and 12dB/oct. This can control how strong the cut is. Play with them as you like, but I usually leave these two at default, unless I want to really cut noise out of 40m rag chew, and set 101 to around 1900Hz, and 102 to 18db/oct. Try playing with Slope around Menu 120/121, also, if wanting quieter 40m work. Along with adjusting the RF GAIN knob.
Trick #2: WIDTH knob
 The WIDTH knob is useful, and similar to the frequency adjustments we just made in Trick #1. Try it out, but you will likely find that adjusting the setting between 1800 to default 2400 is good for helping remove some annoying close-in signals, and a bit of extra hiss. For general listening of strong signals on 40m, I like listening around 2600 to 2800, or even wider on an eSSB signal. Most of the time, I keep it parked around 2600, until I encounter a tight DX signal.
Trick #3: SHIFT knob

The SHIFT knob can be useful to tweak the signal just a smidge, so that you hear it "a little better" than you do at default. Oddly, I find that it often works best just a little to the left, at around -40Hz to -60Hz, on many signals. This will vary, however. Move it around until you find you're hearing the signal pop a little more. From here, we'll pop it even more with some more tricks.
Trick #4: CONTOUR menu settings
If we long-press buttons, such as the CONT/APF button, you'll notice that we are sent directly to the proper menu setting, without having to hunt for it. Menu 108 RX DSP CONTOUR LEVEL is a really great one. About 80% of the time, you'll find you want the 108 CONTOUR LEVEL set high -- between 8 to 11. I leave it on 10 or 11, to start. I might boost the snot out of it even higher, once I've tweaked, depending on the signal, which may require additional adjustment of menu 109. The 109 RX DSP CONTOUR WIDTH seems to work best at 10, but sometimes lowering to 8 will pleasingly shape and remove rushing noise around the signal, as menu 108 is increased.There can be times when you actually want to create the opposite of a contour, and making a kind of dip, which is caused by going into negative numbers on the 108 CONTOUR LEVEL. Try it out, and see if/when that might help your ears.
I tend to leave menu 108 and 109 like this, and only hit the CONT/APF button when I need to pop something weak. I then tweak and adjust as needed.

Trick #5: CONTOUR knob
 You might notice that we're not following the knobs in order, but that's by design. I prefer to shift first, then hit the CONT/APF button (which I usually leave set as in the above picture), and adjust the CONTOUR knob, then tweak more, as outlined in Trick #4. Like with the SHIFT knob, we're looking to find where we can best peak the signal a bit more than we heard before. More often than not, the CONTOUR knob stays in the middle at default, but not always.
Trick #6: NOTCH for removing hiss (bonus function, besides carrier removal)
 The NOTCH is generally thought of as being used to remove an annoying carrier or noise bothering our signal. But did you know that a neat trick is that you can also use NOTCH to remove some of the hiss next to a signal, once you've made some strong CONTOUR boosts in menu 108? The nice thing about this is the NOTCH knob is pretty much set and forgotten for this type of trick. I find turning the NOTCH knob to around 1200 HZ, while leaving menu setting 111 RX DSP IF NOTCH WIDTH to NARROW seems to clear-out some of that rushing noise we've created with the extreme CONTOUR setting adjustments to menu 108 and 109. Again, all of these NOTCH settings are mostly going to stay set there, unless you need to fiddle with them to remove a bothersome carrier. Just know that the numbers outlined here can help remove some rushing sound brought on by extreme CONTOUR. Just hit the NOTCH button to employ the settings, as needed.
Trick #7: Menus 105 and 106, LSB and USB RX CARRIER
Remember earlier when I said I owned an Icom 7300? Many of the Icom rigs have Twin PBT knobs, which are very useful for shifting the passband around to highlight a signal. I always felt the Yaesu rigs were missing this, or only had half of it, given that they had just a SHIFT knob. Luckily, I recently found menu items 105 and 106. Choose the correct one for the side band you are using (USB or LSB) and you've found the other half of the Twin PBT. Adjusting these can clear up more hiss, and help a signal pop even more! These are very dependent on signal, so choose the correct side band and set as needed and change per the signal you are on (note that adjusting LSB when receiving USB does nothing, and visa-versa). This adjustment is very powerful!
Trick #8: RF/SQL (RF GAIN) Adjustment, and AGC Slope
 Not as many hams make use of the RF Gain adjustment these days, and it's a shame, because with some rigs, you can really boost a DX signal this way (as outlined in the 2nd paragraph, below). First, make sure your menu item 036 GENERAL RF/SQL VR is set to RF, which is the default. After that, you are free to use the RF/SQL knob to adjust the RF Gain. Use this by backing it up right until the signal gets just a little quieter, so that some of the extra hiss is removed from the signal.
You also have the opportunity to add AMP1 or AMP2 in the IPO, and then unlock the AGC (Auto Gain Control) for maximum signal boost. An important note is that the AGC can be turned off entirely, by a long-press of the white AGC button. From there, you can "ride the RF Gain" manually, which may be to your liking. This can be used to great effect on some older rigs, especially. It also made for a lot more signal boost on my former Icom 7300 -- not as much of an advantage over the typical SLOW/FAST/MID AGC choices that Yaesu gives you with the FTDX3000, when you press the white AGC button. You will soon learn, however, that running the AGC OFF makes a pretty nasty noise if you suddenly encounter a strong signal booming-in on DX that you have boosted the gain on, in an attempt to strain and hear it!
004 AGC AGC SLOPE is a menu item that can help you remove a bit of noise around a signal, so play with this and see which one you like. It can also effect how loud a signal is coming in, so keep that in mind. I am finding it can be more pleasing to change it to SLOPE on a rag chew, but it can cause a weaker signal to be lost, a bit. Personally, I find that simply adjusting the RF Gain manually can achieve nearly the same effect, without having to go into the menu to change this item.
Lastly, you also have options to tweak 001 AGC FAST DELAY, AGC 002 MID DELAY, and 003 AGC SLOW DELAY, if you like. One tweak you might like is to change the AGC SLOW DELAY to about 3000 or 3500, from the long default of 4000. This will affect how long it takes for the AGC to recover after a quick blip of interference. Sometimes it's annoying to wait a long time for the AGC ramp back up, after that. I mostly leave the other AGC settings alone, but you might find some happy medium adjustment for your liking.
Trick #9: Menus 120 and 121, HF SSB SHAPE and SLOPE
I'd like to mention that you can play with the 120 RX DSP HF SSB SHAPE and 121 RX DSP SSB SLOPE menu items, if you wish. I mostly leave them at default, personally. They do change the sound of the audio, so they are worth mentioning. You might find one setting more pleasing than the other. Menu 121 seems to affect that "rushing sound" we hear, so choose one of the 3 choices that is to your liking, on a particular signal, if you care to tweak. This item also seems to weaken audio punch response if you choose STEEP, and make for a more forward punch to the sound, if you choose GENTLE.
 Trick #11: Additional notes on NB, NBW (Noise Blocking)
The FTDX3000 has fairly decent Noise Blocking ability. Consequently, it's one of those settings best left OFF, until you need it. The use of it is properly outlined in the Yaesu manual that came with your radio, so no need to get into great detail, here. Long-press the white NB button, then hit SELECT and adjust with your CLAR/VFO-B knob. First try NB, to see if it clears up noise, then NBW for wider noises that NB might not cover. See the Yaesu manual for more info.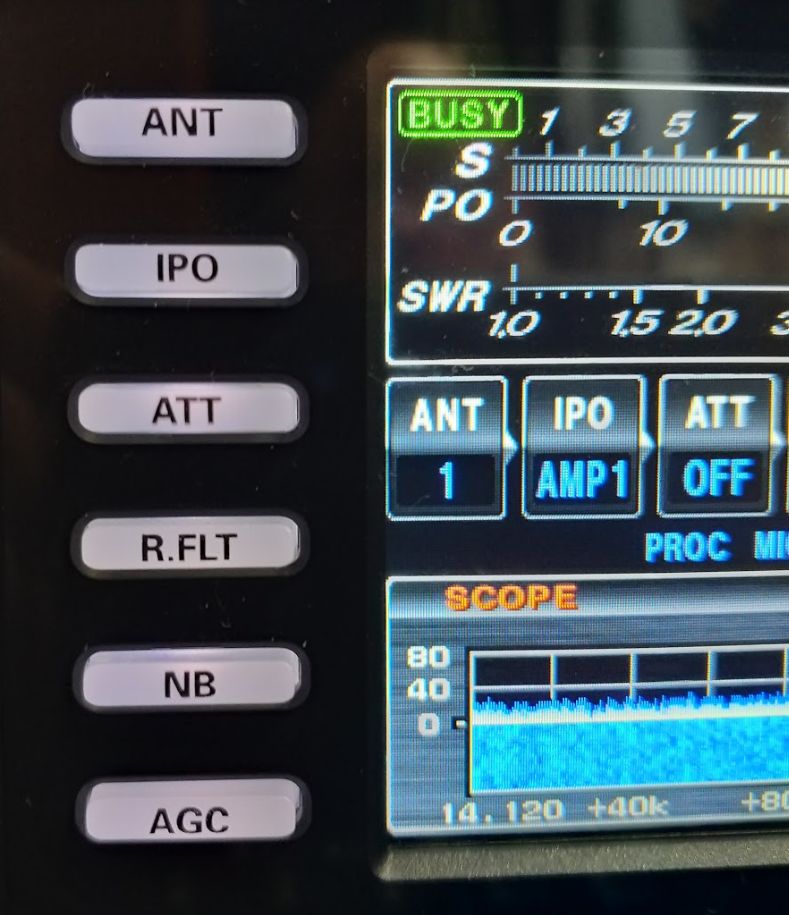
Trick #12: Using the Noise Reduction
 The DNR (Dynamic Noise Reduction) on the FTDX 3000 is pretty amazing. That said, after other adjustments, you may find your signal to be cleaner without it. Again, the Yaesu manual explains it pretty well, but to turn it on, you need to be viewing the bottom screen menu, after pushing SCOPE as many times as needed. Use the arrow keys to highlight DNR, and SELECT to toggle on or off. You can change the intensity of the DNR by long-pressing this SELECT button while DNR is highlighted, which will take you to menu item 110 RX DSP DNR LEVEL. Use your CLAR/VFO-B knob to adjust per your liking. Experiment on various signals, at various levels, to your liking. Some of the really high levels might seem overbearing (and usually are) but can sometimes hit just that right profile to pull out a weak signal.
Thank you for the tips & tweaks with explanation. I live in Buffalo City, NY and this has made bearable the noisy power transformer 3 houses down the street 85% go away and hear more stations and less QRM. 73 de AA2PR, Carlos.
ReplyDeleteGood news. Glad it helped someone. This radio is much better at my high-noise QTH. Having a horizontal antenna (instead of a vertical) helps a lot, too. :)
DeleteThanks for this - I get my new FTDX3000 next week and it's good to get off on the correct footing from the start. Much appreciated. de M7MCQ
ReplyDeleteGlad that it was helpful! I tried to comment once before, but I am not sure it took. There are a lot of menu items you can tweak on the 3000. What you put into it, you get out of it. :)
DeleteThanks a lot Derek, I was able to use the information to help make ssb signals more intelligible, I usually do not have a noise issue at my QTH.
ReplyDeleteGlad it was useful. A lot can be done to make rag chews even more pleasant than they already are.
DeleteThanks a lot. I bought a Dx.3000 but i feel super stupid in front of it. Every help is welcome.
ReplyDeleteIt isn't the radio for everyone. I enjoy it, but am considering trying a Kenwood 590SG next year.
Deletethanks for share
ReplyDeletede SV3IRG Dinos 73's
I decided not to purchase the mtu after reading your blog. Tnx de PD3GIJ.
ReplyDeleteI haven't tried it with CW. It might be far more useful there. I find the ATT is enough in the FTDX3000 to do what I need, on SSB. There is a guy who has a video on YouTube, showing his Icom 7300 attached to the U-Tune unit. Having formerly owned a 7300, THAT is a radio which could benefit much more from a U-Tune unit, should you learn from him how to attach it. I'm guessing an FT-2000 or FT-950 might find it more useful.
DeleteThe rare instances where I find the U-Tune useful on my 3000 include when I'm wanting to really quiet noise on a rag chew (stronger signal) and also quiet lots of atmostpheric or local noise to make medium and strong signals more comfortable to listen to. I turn it on, and offset from center just a bit, then add some RG Gain. I'm not finding that it helps me a lot on faint DX, most of the time, because the signal is somewhat degraded. It can help with faint DX, on a very high noise day. But still not worth the price as new.