Friday, December 16, 2022

Accessing free streaming American TV services from overseas

 Although I use this blog mostly for ham radio communication purposes, I thought it might be useful to pass on other knowledge that I have found helpful.  People living in the USA will not find this post to be anything new, but it may be useful to other expats and non-Americans living outside of the country.  In this entry I will show how you can easily enjoy watching free (and legal) USA television/movie services from outside of the USA.


*** To skip to a quick "how-to", jump to the last paragraph of this post.


The Free Apps and Websites

First of all, we all know that movie services such as Netflix, Paramount+, and Disney+ are available for payment in many countries around the world. Being a stingy guy, however, I don't pay for these services.  In fact a goal of my wife and I in 2022 has been to remove as many recurring monthly charges from our credit card as possible.   This meant that, until recently, there wasn't much American TV I could watch from here in Seoul unless it was part of our local Korean cable-TV package.  

Here are a few of the better free movie services, apps, and/or websites that allow you to stream television if you are in the USA (or if you use a VPN from outside of the USA).  Many Americans access these using devices like Amazon Fire Stick, Roku, or a Google TV device.  But overseas expats may find it easier to just use their computer, tablet or phone with a VPN.  If you use a VPN, such as the FREE VPN from Proton VPN, these can be accessed easily.  

Often these apps are not located in your host country's app store, but are in the USA app store.  You can also side-load these apps (Android-speak for getting your app from a non-Google app store or location) from other websites like Amazon Appstore, or sites that host apps people have grabbed and uploaded, such as APKPure (always use caution when sideloading apps, and scan them for viruses/malware).

The list so far:

1.  Pluto TV
2.  Tubi
3.  Plex
4.  Crackle
5.  The Roku Channel (I believe you now need proof of using a Roku device to access this one)

Other sites may appear or disappear, and I will try to update this list every once and a while.


About VPN's

Accessing American movie services, apps, and websites often requires a VPN.  If you do not live in the USA and try to see them, a visit will end up in a greeting telling you that you don't have access in your country, or that the service is "coming soon" to your area.


If you don't know what a VPN is, it's a service that hides your IP address and location, and makes it appear to be in another country.  NordVPN (a paid service) has a great video explaining them.  VPN also provides a high level of security.  This service is often used for nefarious purposes like torrenting illegal movies/programs (some VPN's block such use), but there are also many positive uses.  For example, people in China can use a VPN to see around the "great internet wall" that their country uses to block information or keep control of world news.  Here in Korea, it allows expats to make their computer appear in America, so they can access USA Netflix (which has more movies than Korean Netflix).  A VPN also allows access to geo-location blocked sites when buying gifts for others overseas, like from Home Depot's website.  Other uses include overcoming geo-blocks on video streaming services which the Korean government considers "adult".

I have made judicious use of paid VPN services over the years... ummm... to visit the non-adult TV sites listed above.  Most recently my 3-year subscription to NordVPN ran out, and after they tried to almost triple the cost at renewal I decided not to renew it.  (Note: this led to them successively reducing the charge back to my original billing price in monthly emails to "get me back").  

I have not returned to NordVPN, because I have so far found Proton's free VPN service/app to meet my meager needs.  If you don't want to pay any money, I suggest you make a free Proton.me account and install their free VPN program or app.  You need to run it and connect to the United States option for the various movies sites on this page to work.  If you run the app on your phone, be sure to reopen it and turn it off when you don't need it (or your internet access will seem slow).  Here is a look at the Proton free VPN program in use on a computer.:


Paid and Free VPN services

Good paid VPN's usually cost anywhere from $3 to $6 per month.  Top names are NordVPN, CyberGhostVPN, ExpressVPN, ProtonVPN, TunnelBear, and many others.  As of this writing, I believe the first two on this list (Nord and CyberGhost) are owned by the same company.  Both are considered to be excellent.  Something worthy of note, however, is that the popular Opera web browser, which is trusted and has been around for years, includes a free VPN option.  Also, the ProtonVPN people graciously allow partial free access to 3 countries (USA, Japan, Netherlands) through their app.  Anyone may download and use this free service, although services are limited  to no torrenting, and Netflix or other jealous sites may go over and above in attempts to "sniff out" the basic level of this VPN and disallow its signal.  The more intensive VPN abilities to bypass tricky sites and government blocks require a paid VPN service.  Oftentimes VPN services do offer free 1-week subscriptions to try the service out to see that it meets your needs.  Others even offer a static IP option that is only used by your computer, fooling websites into further thinking you are indeed a household at one location that never moves.


An Inside Look


These sites are free only because they serve you ads every 10 to 15 minutes.  This can be very annoying, or not much of a bother.  It often depends on the service and/or popularity of a show that is playing.  You will find that some of these streaming sites (Crackle, for example) are actually owned and operated by the "big names" in the industry, such as Sony.

Here is a quick look at what the best free sites offer:


Pluto TV


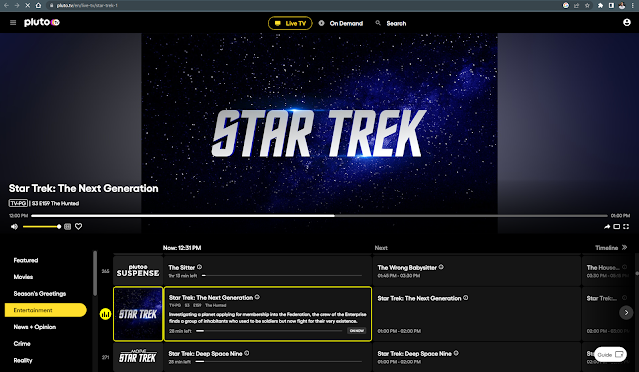
Pluto TV has become my favorite for its large implement of hundreds of very good live channels. Many of them include formerly highly popular shows from past years on a loop, one after another.  As you can see in the example, Star Trek is one of them (there are Channels for at least 3 different Star Trek series).  Other popular series like CSI, Stargate, Doc Martin (a popular British TV show) are examples.  The compliment of shows -- and GOOD shows -- is dizzying.  There are categories for Crime, Reality, Gameshows, Daytime TV, Comedy, Classic TV, Food, Culture, Gaming and Anime, Espanola, and so on.  Quality appears to be at least 720p on shows that allow it, and is very good.  Of course, as with all of these apps, the video will expand to full screen, or nearly so.

Pluto TV also offers a plethora of on-demand movies, many of which are free.  These are not all worthless old titles, either.  You can find a lot of good stuff here.


Tubi.tv


As far as these free sites go, Tubi is absolutely massive, and chock full of great movies for free.  There are also many Live TV channels, including live news from traditional news outlets, sports re-runs, and a mountain of others.  If you like to watch movies, you'll spend a lot of time on Tubi, given its excellent free content list.  


Plex TV


Plex offers a wide variety of "so-so" older movies, with a few decent movies from the past 5 years sprinkled-in.  The Live TV channels, however, may prove very interesting to you.  There are so many shows (over 200+ channels claimed).  You're bound to find several things you like.


CRACKLE


Sony's Crackle offers a fairly extensive list of movies and TV shows.  It can be a bit wonky to use at times, and quality isn't the best.  Sony is very aggressive about protecting its content, so they tend to be a bit lower in bitrate with crushed blacks and a generally dark look.  Still, there tend to be some good titles here.  I've found the level of quality to be a bit off-putting, compared to Pluto, Plex, and Tubi, however.  Sony needs to up its game.


The Roku Channel


Roku offers this channel for free for those who use one of its players. This is a fabulous channel, which used to be free to anyone who could load it and use stateside, or via VPN.  Lately, however, they seem to block access to non-Roku owners (although I was given a temporary free taste before it began demanding a Roku account).  If you use a Roku, you may need a VPN that has been set up through your router in order to fool the Roku device.  If you can get it to work another way, or have better luck than me, please comment below.  By all accounts, The Roku Channel is one of the best free movie channels out there.  If you are able to access it, you will be rewarded.

A Quick "How-To"


To access these sites...

By Computer:


If you are on computer, just go to the proton.me website and make a free account.  Download and install Proton VPN.  Run it, and turn on the United States VPN link. Then go to your free streaming website of choice (found via google, if you search for Pluto TV, Tubi, Plex, Crackle, etc).  The site should work fine once you have the United States chosen and running with the Proton VPN on.  If they don't, it might remember you are from outside of the USA if you accessed without the VPN on. 
Try closing the browser and going to the sites again.

Android:


First get the free Proton VPN app from the Google Play Store. Make a free account there.  Run it, and turn on the United States VPN link. Then you can either go to your website of choice (found via google, under the names listed above), or install the apps. Getting the apps requires sideloading them.  The problem is that these apps are not available to you in a non-American app store.  You can get them from APKPure or elsewhere, if you google then download the .apk file and install.  You don't need the VPN running to use APKPure's website.  Note that when you try to install these, your Android phone will ask you how.  Use the Android Package Installer (or similar-sounding choice).  It will also block the install with a warning about using apps from an outside source.  You must allow this ability within Android.  This can differ, due to your version of Android, but the toggle for this is usually something in settings like "allow apps from outside sources."  Please note that you may need to update these apps manually after a few months or years, if they stop working.  People usually upload updates to APKPure.

Apple:


Apple users will need to install the free Proton VPN app (check your app store), pay for a VPN, or use the Opera browser with VPN turned on to access the websites directly (Opera should be found in the app store).  Making an account with Proton is free.  Many of the apps for these sites are in the USA app store, but not in other country app stores. Apple access is a bit more difficult that the other options.  Computer access is easier.

Friday, February 25, 2022

Inexpensive but very nice desk mic for the Kenwood TS-480

 I love a good bargain.  I especially enjoy a bargain that works well, and saves me a great deal of money in my ham life.  Recently, I took a chance on purchasing a $33 (38,000 Korean Won) microphone from China off of the website Aliexpress, and it turned out to be a great find.

Note that the TS480 is not listed, but if it lists for these radios, the PTT works.


Even though my Kenwood TS-480-SAT is an aging radio, I have come to enjoy using it.  The remote head and minimalist overall size (originally mean for the car) works well as a discreet desk rig.  Now, normally I run a Yaesu FTDX3000, which is surely a better radio, but the TS-480-SAT is certainly no slouch.  The Kenwood's main function is as my 100w QRO portable rig, but I sometimes fire it up on the desktop, when I just want to try something new.  The only issue was that the Kenwood stock hand mic (although a decent mic) makes a little handling noise, and requires hanging to keep it from falling off of my desk.  I really wanted a desktop microphone to use at home for it, so that I wouldn't destroy the stock hand-held (I've already damaged two Yaesu MH31b mics by dropping them).  

I Like Stock Mics

After playing around with several different microphones, I've always found myself gravitating back toward the stock mics sold by the radio companies themselves.  They may not always produce a smooth, boomy AM-like sound, but they do provide excellent results in terms of raw communications, and the cables are usually better. Also, they tend to keep their value, so if you buy a good used one, you don't lose much.  You might even get it all back, or make a few dollars.  Being a "stingy ham", I'm certainly in favor of a high resale price, should I part with a piece of equipment!  Of course, buying a mic branded by the same company as my radio is often quite expensive.  You do get more resale on the back end of the sale, but you still have to "cry once" when you pay for it, initially.  Such prices are even worse when you are a ham living in a country like Korea, where shipping can become expensive.  Good used Kenwood desk mics tend to disappear within minutes of being sold on the Korean used ham sites.  They are quite popular, and have held or gone up in value, in recent years.  So "the stingy ham" was itching for a cheaper way...

Taking a Chance on the OPPXUN


Enter the OPPXUN desk mic.  This same mic is actually sold under a few different names on Aliexpress (I assume they are likely the same mic re-branded).   It is also sold in a Yaesu model, so Yaesu users might want to look into it.  I found the OPPXUN to be the cheapest at the time of purchase, so I went with it.  You'll note that the radios listed as working with this mic are NOT HF radios.  They're all VHF/UHF, as I understand.  Even still, the plug is identical, so no adapter is needed to fit a TS-480 radio.  Not being on the list of approved radios for this mic was the chance I took. I felt reasonably comfortable in purchasing this mic, however, as I learned from N0AKF that his Kenwood KMC-9C mic (which this Chinese mic is a copy of) worked very well on his TS-480. In fact, he preferred if over the hand mic.  I wrote to him, and he put me at ease with the idea of the Chinese OPPXUN mic at least having a chance at working, given that it serves the same Kenwood VHF/UHF radios.  I don't believe the left button has any usable function for the TS-480, but the right button works perfectly as the PTT, without any cheap clunking or clicking noise that my hand mic suffers from.  There is a felt/rubber base pad on it, which keeps it from moving around.  You can leave it on a desk, or hold it in the hand and press the top part of the button, for operation.  My preferred method is to leave it setting there, and grab it when I need it, lifting it to my mouth.  It works either way.  The mic is a smidge omni (meaning that it's not fully what I would call 100% Cardioid in pattern), If your shack is very noisy, I'd suggest going with something a bit more toward super-cardioid in pattern.  That said, it works well.

The Verdict

The mic was ordered just over three weeks ago, around February 4.  The seller sat on the order until the last moment before Aliexpress automatically cancelled the shipment, but did eventually send it.  Korea is close to China, so I was able to receive it barely a week after it was shipped.  I couldn't wait to plug it in. I noticed that the mic was well-built, and had a decent amount of weight to it (which is to say it's not thin and light). 


Upon plugging it in and testing my RX via WebSDR around Asia/Pacific, I was rewarded!  The sound is very good (typical good/high quality electret sound).  From the TS-480's widest 2.4 TX audio bandwidth and flat EQ, to the tighter 2.0 bandwidth and HB2 TX filter setting, the mic sounds excellent enough.  I prefer its versatility over the stock Kenwood mic.  I enjoy using it either with or without compression.  I don't notice a single RF-related problem, so it seems to be shielded well.  Highly recommended!  My only suggestion would be to purchase a cable extension for RJ45, which has a straight-through pin configuration (the coiled cord is a little short, and only good for 2 to 3 feet, comfortably).  

Back side of the mic

Audio Test as follows.  Receiver was a KiwiSDR receiver at BM2KVV in Taiwan (about 1,550 miles away), set to RX at a bandwidth of 2600Hz, giving it a little extra than my radio could generate. I was transmitting at the stock bandwidths available on the TS-480SAT, which included 2400 and 2000Hz.  Antenna was a 2-el homebrew 20m yagi at about 60 to 70 feet in the sky, on top of my building.


UPDATE:  I wired up a patch cable to use this mic with my Yaesu FTDX3000, after selling my TS480SAT.  It works just fine, and actually does great with no EQ on it, but there is not really any bass available at wider than stock 2.4kHz settings. Just so you know...

Thursday, February 10, 2022

Rode Procaster Mic Settings For Yaesu FTDX3000


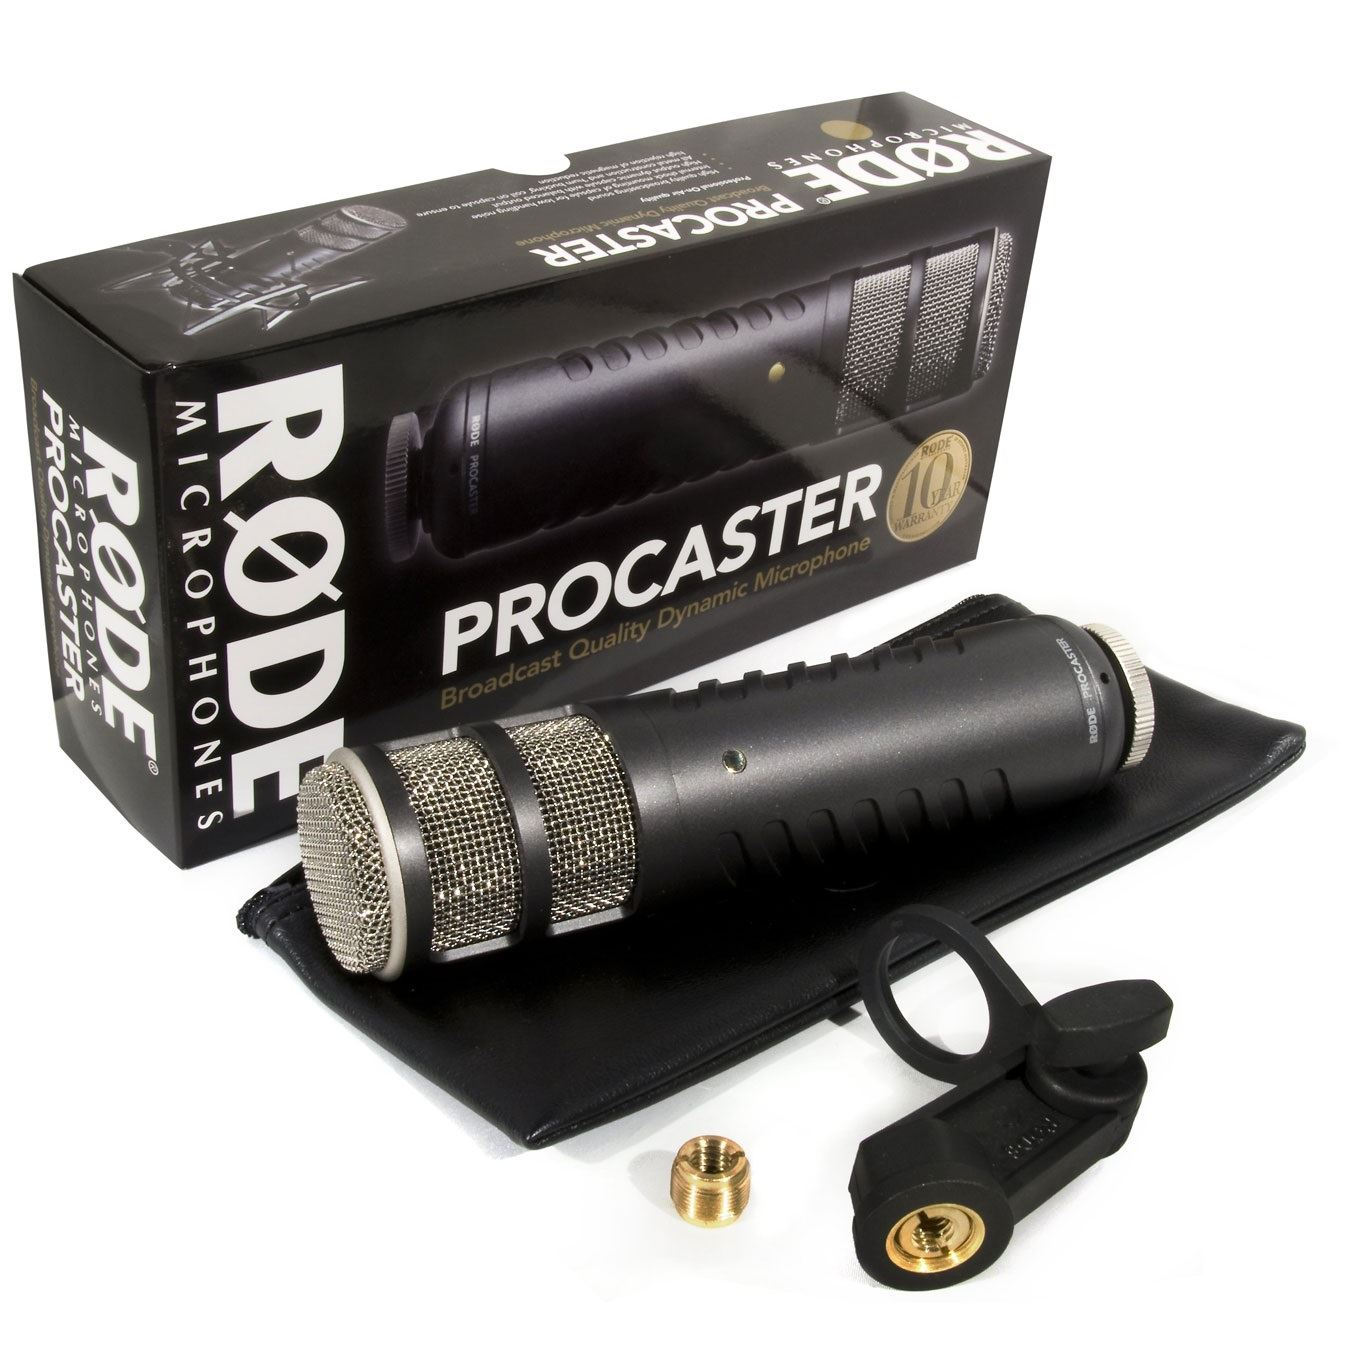
I recently purchased a Rode Procaster, and decided to try it out on my Yaesu FTDX3000. I am happy to report that this is an excellent microphone!  I am generally a DX'er and a long-distance (5,000 mile+) rag chewer, so the following settings make for a clean sound with a bit of bite (but not overly so), with about 0 to 5% compression.  For close-in rag chews, up the bandwidth at Menu #104 to something like 200-2800, or wider, and lower the numbers on the high end toward the default specs.  

Please note that a pop shield or sponge is an absolute necessity with the Procaster, unless you "talk across" the front of it, to control plosives.  It's not a very plosive-friendly microphone.  It is, however, as close as you are going to get to an Electrovoice RE20, at around half of the cost.  If you can't afford either of these two excellent mics, I suggest looking into the $25 Behringer XM8500, which is a steal, and also sounds excellent, with proper EQ'ing.  

So here are HL1ZIX's EQ settings from thestingyham blog, for the Rode Procaster, and the Yaesu FTDX3000.  You should note that I like to "eat the mic" with these settings, and get in so close I touch the sponge, to take advantage of the Procaster's "proximity effect".  This is partly why I cut the lows so much.  The proximity effect adds a lot of bass, which will overload your ALC if you don't trim it out.  The overall effect is, however, a very forward low-end sound:

168 TX AUDIO P-PRMTRC EQ 1 FREQ 200
169 TX AUDIO P-PRMTRC EQ 1 LEVEL -17  (you might prefer -15)
170 TX AUDIO P-PRMTRC EQ 1 BWTH 2
171 TX AUDIO P-PRMTRC EQ 2 FREQ 1500
172 TX AUDIO P-PRMTRC EQ 2 LEVEL -3
173 TX AUDIO P-PRMTRC EQ 2 BWTH 1
174 TX AUDIO P-PRMTRC EQ 3 FREQ 2700
175 TX AUDIO P-PRMTRC EQ 3 LEVEL 6
176 TX AUDIO P-PRMTRC EQ 3 BWTH 5

Incidentally, these aren't bad for the Yaesu MH31b stock hand mic, either.  I find this really great at the 300-2700 setting on Menu #104, for DX'ing, if you push it to the top of the ALC to get about 0 to 5% compression.  If you want a bit wider signal, change #104 to 200-2800.  Not having your radio tuned to a proper SWR level may affect the ALC.  If you like a really thin signal with more bite, change Menu #104 to 400-2600.

The settings above are with PROC (compression) enabled.  I have my COMP/PROC (menu item 177 to toggle from TX PWR, then turn the far left inside knob, next to MOX button) set to 45.  If you want to run these settings without compression, apply them to menu numbers 159 to 167, and turn PROC off. 

Of course, you might tweak the EQ FREQ (frequency) numbers a bit, per your voice.  But remember, little tweaks in the frequency are probably where you'd need to make a change, if any.  Once you start changing the LEVEL or BWTH (bandwidth), you might find you compression ability suffers, or you could overdrive the ALC.  My other Yaesu radios acted differently, but the FTDX3000 seemed especially finicky with wanting to overdrive the ALC.

My numbers seem to have angered at least one purist on QRZ.  These are settings for a DX sound, rather than a "dull, wet blanket" BBC sound.  The high frequency level and bandwidth of menu items 174 to 176 are set in this way to both create just enough high-end bite, which is good for DX comms,  I tested this remotely via WebSDR, from 3,000 and 5,000 miles.  If you choose to set those high frequencies to a lower level and bandwidth, you may find it difficult to achieve processing/compression of a useful level for DX (and that's OK, if a more smooth sound is your goal). 

These settings also allow you to drive the ALC to a higher level without exceeding it, and create about 2% to 5% compression at the top of the ALC scale (with my voice). Please set your Mic Gain level so that it does not exceed the limits.  You may find your FTDX3000 takes 5 or 10 minutes to "warm up" before the ALC acts properly.  I find mic levels reduce a bit, after a few minutes.  Check your levels often.

I have found that Yaesu's parametric settings are not the same for every radio.  The ALC and COMP can act differently on each rig.  Your radio might even differ at bit, so I suggest you listen via an SDR receiving station online, and make adjustments to your sound.  Always watch that ALC, and do not exceed it, lest your signal become "dirty".  Here is a map to Kiwi SDR sites, but you may have to search yourself, if their link changes:
 

Map of SDR Receivers


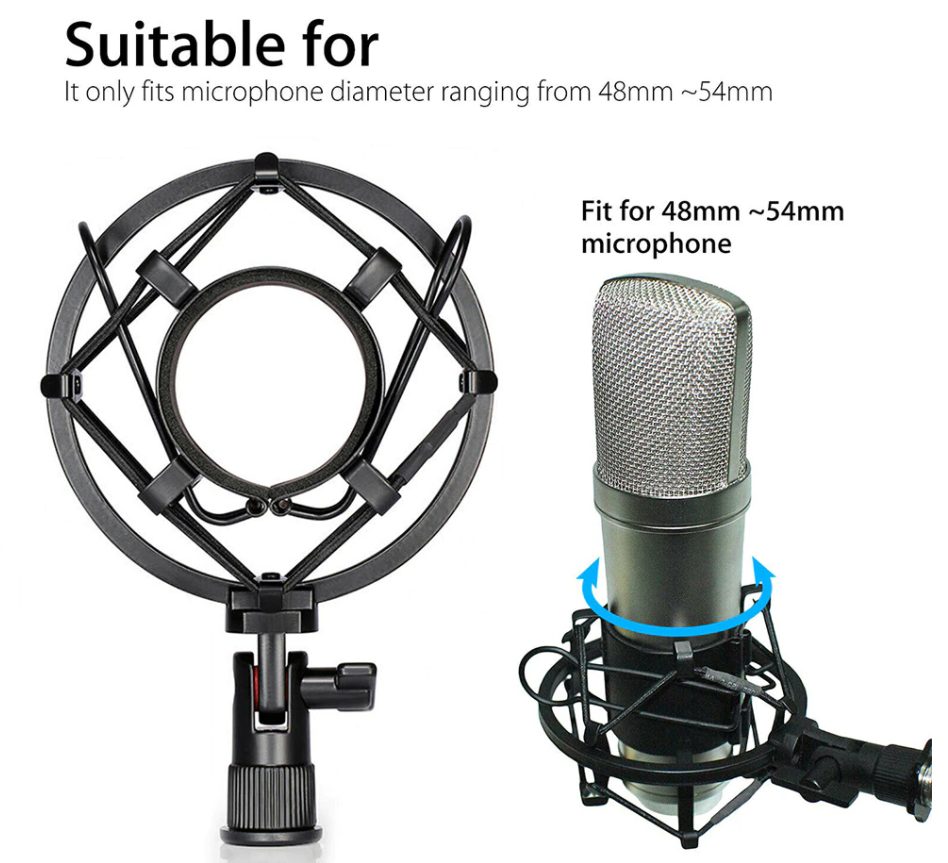
Lastly, I find the shock mount accessory for this mic prohibitively expensive.  This shock mount is cheap, but works really well.  If the link dies, just search to find a shock mount for a 48mm-54mm microphone.  The same model is sold by various sellers.  I have purchased from AliExpress for over 5 years, and had very good luck:

https://www.aliexpress.com/item/4000491039037.html?spm=a2g0o.9042311.0.0.4d264c4dUTefd0


You can also find a sponge on AliExpress for cheap, and help stop the Plosive P-pops.  The mic is about the same size as the popular AT2020, so the same sponge fits:

https://www.aliexpress.com/item/1005001551880794.html?spm=a2g0o.9042311.0.0.27424c4dQXYelV


Shoot me a message, if you have any questions or comments...
HL1ZIX

Sunday, January 31, 2021

The Best Microphones for Teachers

Avoid the Hype (and Probably the Condensers)

 
I work as a teacher at a university. When the pandemic hit, I suddenly had to immerse myself into the world of audio/video streaming and producing online videos.  To be sure, I was more prepared than most.  In another life, I spent 8 years working as a television writer and producer for ABC and CBS affiliates back in Iowa.  After almost 20 years of living overseas, however, I found myself a bit rusty.  To catch up, I poured over hours of YouTube videos, bought several mics, and set out on a quest to find the best inexpensive mics and video editing programs to help me produce better quality videos.  In truth, I was buying $200+ XLR condenser mics and $120 audio interfaces to power them.  My setup sounds great, but I have since learned it was overkill.  I'd like to save you some money, so I am adding this information to my radio blog.

I wasn't going to write this entry, until I searched "The best microphones for teachers" on Google, and found that many of the answers were conflicting.  In short -- what were once blogs are now paid ad blogs selling microphones that I wouldn't recommend to anyone.  For example, the #1 search on Google revealed the Blue Snowball to be a great value for teachers.  Let this serve as a warning:  the Blue Snowball is NOT a good option for teachers.  It's a noisy option with a weak overall sound and it picks up a lot of room noise.  It's one of the least impressive mics I've ever heard, and is completely carried by marketing to suckers who don't know any better.  

Blue makes some really nice microphones,  especially when you are talking $300+ XLR mics like the Baby Bottle SL, but they are also very slick at marketing hype on the consumer end.  Another mic which everyone reads about is the Blue Yeti.  A decent microphone?  Yes... quite good.  Would I buy it for teaching?  No. Why not?  It's complete overkill, is more money than a teacher needs to spend, and picks up a lot of noise off of your desk, unless you hang it on a boom arm with a shock mount (spending even more money to do so).  Yes, it looks impressive on a desk, but you don't need all of those polar patterns, and it will hear everything in your room.  Want to spend a lot more money and stop the thumps from your hands on the desk?   Be forewarned -- on a shock mount the Blue Yeti looks positively idiotic.  Blue also seems to have have an affinity for creating mics that are difficult to shock mount and look like a piece of male anatomy (see the Yeti hanging downward off of its ludicrous shock/boom system or the Blue Ember by itself to see what I mean).  

So now that I've poked holes in two of the options you may have read a lot of hype about, let me mention a few mics that will sound great and save you money.  I'll start with the cheapest, and work my way up:

Best Desktop Microphone under $35: Fifine K668 (USB Version)


Fifine is the absolute king of inexpensive mics that sound "decent".  They made a condenser-style model which also receives good reviews, but I prefer the k668 USB version.  In all honesty, this mic is all that 95% of teachers who use Zoom will ever need.  If you just want to sound good without fuss or lots of extra confusing components, settings, etc. -- get this.  You can find it on Amazon, Ebay, and direct from China's Aliexpress, if you're in a pinch (it's a good site. I've bought from them for years. Use sellers with the most sales and ratings).   This same mic has several copies with different colors by different manufacturers, but I can only vouch for the Fifine k668.   

Why is the Fifine excellent?  This mic is a dynamic USB microphone that is pretty much plug-and-play.  The microphone's cardioid pattern helps control echos and room noise, but is not TOO tight that you can't be away from it a bit.  It comes with its own small stand, and as long as you move it as close to you as possible, it will work well.  You don't have to worry about special settings or learn extra software.  Plug it in, make sure the mic is selected, and bam.  Excellent sound for the price.  How good?  Take a look at this video, which was produced by another gentleman.  I will note that the K668 does have a smidge of that tell-tale cheap Chinese shrill top-end, but Zoom will remove that, anyway:


Best Smartphone Microphone under $50: Movo VXR10


The best microphone for a smartphone under $50 is the Movo VXR10.  This mic is a very small shotgun style mic that will fit on top of your smartphone.  This mic will give you the option of having excellent audio without fuss, if you wish to hook it into a smartphone and go mobile.  My coworker owns this mic, and it's very impressive for the price.  You could even use it as a mic attached to your desktop setup, and also enjoy good audio.  It is not a USB mic, however, which tends to mean you may pick up some more background noise compared to a USB or quality XLR mic.  If you're working with Zoom or similar software, or just using it on your phone, have no worries. It's quiet enough that 98% of people are not going to notice or even care.  

A shotgun style microphone such as the Movo VXR10 is really a nice option if you want the freedom to move around a bit with a phone, yet keep room noise and echoes down.  If you want a mic that sounds great, yet you don't have to see it in your video, a shotgun mic such as this is a top option. Just try to keep it within a distance of arms length to your face, for best audio quality.

Here's another review of the Movo VXR10, in detail:


Best Desktop Microphone at $50: Razer Seiren Mini


If you can afford $50, and want a nice mic from a big name in computer audio, consider the Razer Seiren Mini.  This mic is a pretty design, and comes in three colors: pink, white, and black.  The white looks especially nice.  It is also quite functional on its desk stand, but really shines as a small yet clean mic for a boom application. You won't go wrong with the sound, either.  The main concern with this  mic would be the lack of a shock mount, and that it seems to be easy to make desk noises bother it.  It does have a super cardioid pattern, and has a tighter area for voice pick-up.  It is compared to the Blue Snowball (which I do not recommend), and the highly recommended Samson Q2U which is also listed below:


Best Desktop Microphone under $90: Samson Q2U

If you want a really great sounding microphone that is easy to use, has top-notch sound, and has some versatility for use with both USB and XLR microphone, get the Samson Q2U. Samson has been around for over 10 years, and they make some great mics for the price.  The Q2U sounds great, and is easy to use via USB.  The video reviews and comments about this mic from users speak for themselves.  This mic does an amazing job of removing room noise.  The one glaring negative seems to be that it uses the older USB 5-pin input, which is weaker than the newer USB-C inputs we now use on more devices.  That is the only thing I would be concerned about with the Q2U.  The sound is great, but I would be sure to add a large sponge screen to stop plosives.  Keep in mind, as with many quality dynamics, you don't have as much room to move around.


Best Value XLR mic for Interface Setup: Behringer xm8500


For those of you who would like a step up in quality, and you're not afraid to spend a little more to get it, I present the Behringer xm8500.  The xm8500 is an XLR mic costing around $40 (it used to be closer to $25, but it's gone UP in price because it has become so popular).  It will need pre-amplification from a USB audio interface, or audio mixer board to make it work -- most computer sound card plug-ins cannot work with it directly.  Behringer makes the Uphoria UM2 as the least expensive option to power an XLR dynamic mic such as this, and it's plenty.  Don't get carried away thinking you need anything more than 16-bit audio and 48khz, which this interface provides.  More expensive interfaces will tout higher bitrates, but it's completely unnecessary for anywhere but high-end studio set-ups producing professional music.  Behringer also makes some excellent mixers with Xenyx pre-amps, which cost just a bit more and give you the option of mixing in another sound source such as music via RCA input, for example.  Look at the Xenyx 302 USB, as an option.  It will sound just as well as the USB interface.

The Behringer xm8500 is an outstanding microphone.  I've had one for 5 years, and it's still going strong.  It makes an awesome budget choice for streamers, as well.  It outperforms mics costing much more, and gives the $100+ Shure SM48 and even the SM58 a run for it's money.  You will want to add a $2 sponge pop-filter to control the P-pop "plosive" sounds.

Here is my FAVORITE YouTube mic reviewer at Podcastage, talking about the xm8500:


Final Thoughts:  What About Condenser Mics?


Some people just want that "big airy sound" a condenser mic will provide.  Or they want that imposing look.  I actually go this route,  but unless you are prepared to treat your room, they are the wrong option for teachers. What do I mean by "treat your room?"  I mean spending even more money on acoustic foam to block noise reflections, or the excellent value option -- using thick moving blankets or bedding pads (I use thick Korean style mattress blankets I got on sale for $10 each) on all 4 walls, and laid over furniture or on the floor.  In short -- it's a pain, and work, but I have incredible audio.  Most teachers need not care a whit about this, but I was in TV production once, and I am sort of a fanatic.

A dynamic mic, or even a simple high-quality headset mic, is usually a better choice for teachers because more outside sound is rejected.  A negative of the dynamics, and one reason I like using a condenser with a treated room, is that I can move around more AND get that big sound.  Without the room treatment, however, a condenser becomes a very bad idea quite quickly.

With a dynamic mic, the room sound becomes a bit less of an issue (but even still, hanging moving blankets or whatever you can get to break up the sound reflections on flat walls or floors will make a huge difference).  What makes audio sound good is often not what you hear, but what you DO NOT hear.  You want to remove those noise reflection echoes bouncing around, the motorcycle driving down the street, your kid's in the next room.   A condenser such as a Blue Yeti will hear all of that, and it quickly becomes a problem.  A cardioid dynamic mic like the xm8500 or the Fifine K668, or a Shotgun like the Movo VXR10 not so much, because they tend to favor what is in front of them.  That's another quick tip for you -- get the mic close to you, as in a foot or less, for best audio.  Adjust mic levels accordingly.

A parting note about the cheap Chinese condensers that are $40 or less, and come with a boom arm.  The negative about these mics is often the shrill high frequencies they produce, as well as the room noise they draw in.  That shrill sound is fatiguing on ears in long-form teaching videos.  Fifine also makes a few of these, but personally, I'd avoid the condenser models due to the room noise they pick up.  

Some further information about value condenser mics that I find work well for me in XLR format (with room treatment):  Mackie EM-91C and Audio-Technica AT 2035.  The even cheaper AT 2020 is also a good value option (note that they make a USB model for both the Mackie and the AT2020, although I am not sure if the USB Mackie is similar in sound).  The Mackie is good for teaching, and allows you some room to move around.  It comes with its own cable and shock mount (it is missing a 5/8 to 3/8" adapter piece for some booms or stands, which is cheap to get, but necessary).  It does well against room noise, for a condenser, but I still treat the room.  I also EQ it a bit, because it's a very "warm" mic.  I roll-off frequencies below 90hz, and pull some down a bit at 250hz and 500hz.  I also boost it about 2db from 3,000 to 5,000 hz. 

I like the EM-91C, even though it's quite warm.  I  EQ to help it a bit.  I like how it is forward in the midrange for bold yet clear sound.  It's pleasing through headphones and tinny little notebook speakers.  I took a poll of my students, and found that 70 to 80% of them prefer to listen to school videos this way. They are not listening on hifi stereo systems such as I grew up with.  The EM-91C is clean enough without that shrill high-end that the cheap Chinese mics have.  I also like how the EM-91C cuts off the excessive sibilant sounds that condenser mics often suffer from (especially after compression).  I don't need to de-ess this mic, unless I am boosting with my EQ.  This means most people can make a smooth, warm sound with it without a lot of post processing.  I do recommend a low-cut below 90 to 100hz, to help remove some of that bottom end which is not needed for voice, anyway.

I also mentioned the AT 2020 and the AT 2035.  The AT 2020 is a good USB condenser mic OR can be purchased as an XLR model -- BUT it's a condenser.  Room treatment is a must.  The more expensive AT 2035 is less shrill on the highs, and has better bass than the AT 2020.  It sounds better on a pro level, but it hears a pin drop and is so sensitive.  The 2020 and especially 2035 are more open, wide, and airy-sounding than the Mackie, so room acoustics are even more important.  Both of these mics come with shock mounts, which are essential for condensers.  I put a foam win screen on all of these.  The Mackie will fit a cheap $2 XLR mic's foam screen.  The AT mics work better against plosives than the Mackie does up close, but adding the foam and talking across the mic from a 45 degree angle makes it a non-issue.  You can get very cheap $3 wind screens for them via Aliexpress.

Here is a video showing the Mackie vs. the budget AT 2020 (baby brother to my AT 2035):


Sunday, January 5, 2020

Behringer XM8500 Dynamic Microphone Yaesu Parametric EQ settings


I really like the Yaesu FTDX3000 that I purchased used, last summer. It's a great radio.  I've already added a very popular page on parametric EQ settings for the MH-31b hand mic HERE.  But sometimes people want to add the fuller, richer sound of a dynamic mic to really catch attention.  The Parametric EQ found in radios like the FTDX series gives you a lot to work with.  This can be confusing for some, but it doesn't have to be!  The Parametric EQ really shines when you upgrade to a nicer mic. 

Enter the Behringer Ultravoice XM8500 dynamic microphone.  For under $25, and a little EQ'ing, you can make your radio sound like you purchased an expensive high-end microphone.  In fact, because the internal EQ of the Yaesu is so good, I've had people ask me what kind of outboard equipment I'm using!  My answer -- none!  And they're amazed when they hear how much this microphone costs.


Now, before I continue about the wonderful sound of this mic, I want to opine a bit about adding a dynamic XLR microphone to your Yaesu FTDX3000 (or any newer Yaesu with Parametric EQ).  The XM8500 sounds great, there's no doubt, but in the long run, you might find it a better option to pony-up the approximately $150 cash new, or $100 used, and purchase the Yaesu MD-100 microphone.  Why?  Simple -- when you buy the MD-100, you get a mic combined with a nice switch, internal settings, attractive 2-way cable that works with all newer Yaesu radios, and no need to purchase a patch cable, foot switch, boom/mic stand.  A $25 mic is great, but you have to keep in mind that you're likely buying several other items that will add to the cost.  You're also adding cables and other things that are less attractive.  Here's one more thing people rarely consider -- the back end of the sale.  If/when you go to sell your mic and accessories, you're going to get much of your money back (probably all, if you bought used) if you had purchased the Yaesu MD-100.  When you go with a non-Yaesu mic, you're going to end up with additional things you may or may not sell (patch cable, mic stand or boom, etc).  Think long and hard, because you will get great sound with an MD-100, also.

That said, if you still want to go with an XLR mic, the Behringer is a bargain choice that sounds expensive.


The settings will provide clear mids and highs, along with smooth bass punch.  You may want to tweak the bass up or down a little, per your voice, but I think you will find this to be a great starting point:

1. Set Mic gain about 8 to 10 if using no compression (PROC), or 10 to 20 if PROC is on. Depends on your shack, voice, noise levels, etc., but this is a starting point.
2. Set Processor Level: 5 to 30 per your preference (found on PROC/CAR knob, but can be changed to TX PWR  in Menu 177)
3. Set Menu 104 MODE SSB:  200-2800, 100-2900, 100-3000, or 3000WB.
4. Speak about 2 inches from the mic and adjust levels as needed to account for room noise and compression desired.  Works best to me to be off-angle from the mic 45 degrees, instead of head-on.
  • 159 TX AUDIO: 100    (adjust the low bass freq center point in Hz.  Try 200 or 300 if you want bass cut)
  • 160 TX AUDIO:  -8     (adjust how much you add/subtract from low bass setting -- adjust as needed)
  • 161 TX AUDIO: 4        (adjust the bandwidth area covered by low bass frequency peak)
  • 162 TX AUDIO: 1300  (adjust mids frequency center point in Hz)
  • 163 TX AUDIO: 8        (adjust how much you add/subtract from the mid setting)
  • 164 TX AUDIO: 2        (adjust the bandwidth covered by mids frequency peak)
  • 165 TX AUDIO: 2200  (adjust the highs freq center point in Hz)
  • 166 TX AUDIO: 5        (adjust how much you add/subtract from the highs setting)
  • 167 TX AUDIO: 2        (adjust the bandwidth covered by the high freq peak)
  • 168 TX AUDIO P-PRMTRC: 200 (from setting 168 is for COMP ON)
  • 169 TX AUDIO P-PRMTRC: -15
  • 170 TX AUDIO P-PRMTRC: 1
  • 171 TX AUDIO P-PRMTRC: 1500
  • 172 TX AUDIO P-PRMTRC: 1
  • 173 TX AUDIO P-PRMTRC: 1
  • 174 TX AUDIO P-PRMTRC: 2100
  • 175 TX AUDIO P-PRMTRC: 5 (Note, if you want max comp before pegging ALC, lower to 3)
  • 176 TX AUDIO P-PRMTRC: 1

End note... you will need a mic stand or boom, and a patch cable to go from the Yaesu 8-pin plug to the XLR input on the mic (or you will need a different patch cable for the FT-891, for example).  HEIL sells them on their website, or you can buy them from E-bay sellers like W7YEN.  You'll also need a momentary foot or hand switch, sold by HEIL, or many E-bay sellers.  This one seems to come wired with the 1/8" plug.

Lastly, I'd like to say that I feel this mic is GREAT for DX, as well as rag chew, with these settings.  If you want a local rag chew, set the bandwidth wider (if you have the space) and turn your PROC off.  Peak your volume, keeping the ALC in the lower 1/3 to 1/2 of the ALC line.  Speak about 1 to 2 inches from the mic.

If you want to DX, set the mic to a bandwidth of 200-2800, and turn the PROC on, and boost your mic gain a bit until you get around 5% to 7% peak compression (Note that thanks to an observation by AB2UE, I am editing this and the previous paragraph. The BAR meter, which I originally used, has an odd ALC reading, so I removed comments about exceeding the ALC. I now use the S-METER view).

I have tested these settings with DX contacts out 4,000 to 5,000+ miles, and they all agree that the compressed punch of this mic is far better in an A/B test, compared to a sharp, high-pitched DX mic with the lows removed. 

Traditionally, people have held that the high-pitched sound of a tight-bandwidthed DX mic will "cut through a pile-up" and "concentrate more power where you need it."  I now believe this is urban folklore.  Perhaps this thinking was started to sell pricey mic elements, and perpetuated itself as high-powered DX stations bought into the idea.  After a lot of A/B testing, however, I no longer buy it.  I didn't form this opinion by myself -- multiple DX contacts told me their preference, and they don't lie.  You want both the clean highs and some low/mid punch.

With these settings, you get both.  I'll take what the DX'ers tell me they can hear better, in an A/B test, over urban legend any day!


Monday, August 19, 2019

Yaesu FTDX 3000 Receive Tips and Tweaks


I purchased the Yaesu FTDX 3000 a few months ago.  When I bought it, I knew that it was a pretty menu-intensive machine.  I'm a button-tweaker, and knob-fiddler.  I'm not as fond of menus, but if they're there, I try to learn whatever I can to help me pull out the weak DX stations.  I'm also an SSB person -- not CW -- but once you learn how many of these tweaks work, you can employ them as you like with CW signals.

I sold my Icom 7300 to get this radio, partly because I was not satisfied with the 40m performance of the 7300.  The 7300 is an excellent high-band radio, but it doesn't handle general city noise well on the low bands, and quickly becomes overloaded if you have a lot.  I'm not talking about the Noise Blocker, which is very good on the 7300 -- I'm talking about the plethora of lights, electronics, and noise-producing items that attack the radio's front-end when you're in a large multi-story urban environment such as Seoul, Korea.  Even with attenuation activated, the 7300 whimpers home and cries to mama, losing faint signals in a dithered mess of hiss.  Despite IP+ activated, I was disappointed on the low bands, couldn't hear 40m stations in California (from Seoul), and was unhappy.

I purchased an FTDX 3000 because a ham friend, HL5ZEE, already had one.  I was wowed specifically by the noise reduction capabilities of his 3000.  I had also owned a Yaesu FT-891, which had impressive Noise Reduction.  I have a review of the FT-891, if you're interested, but it's long gone from my shack.  The Icom 7300 has Noise Reduction, but I didn't find it particularly impressive.  Oddly, I've learned since getting and tweaking with the FTDX 3000, that I rarely need/use the Noise Reduction at all!

Enough background -- let's talk about how to improve signals with the FTDX 3000. 

First off, I should mention that I purchased the 3000 along with a Yaesu MTU-80/40 external RF Tuning Unit.  That external box is worth a whole nother review, which will be upcoming.  To keep it short -- 98% of hams won't benefit from the MTU units, unless they have an older Yaesu series radio that it works with, or if they live near overpowering broadcast towers or large ham stations. If that's not you, then save your money.  I thought it might help me in my large city noise environment.  The answer -- kinda sorta -- but not enough to spend $375 on it used, and certainly not enough to spend $700+ for a new one.  The FTDX 3000 has enough attenuation and tricks that the MTU doesn't do as much as it would for, say, and FT-950 or FT-2000.

Enough said on that.

The RX tips and tweaks ...


The FTDX 3000 is menu-intensive, as mentioned.  That said, many of the settings are set once and forget, unless you want to tweak and play around.  I'm going to give you some settings to help get you going.


Before I go there, as with other Yaesu radios, you should learn how to use the IPO, Amp1, and Amp2 settings under the white IPO button.  Using the Amp (and ATT button) are not tricks, but common good radio practice to learn, and they apply to almost any radio.  If signals are coming in strong, especially on lower bands, using IPO will mean a cleaner signal.  To keep it simple, if you are in IPO, your Amp is off.  Adding amplification can pull out weaker signals, but does add a bit of noise.  On the FTDX 3000, I find I adjust these per how they make my waterfall look, so that signals appear just comfortably viewable, there.  I add amplification on higher bands to pull out a weak signal, or weaker overall signals.

Attenuation is also useful, via the white ATT button.  Attenuating a hot band will help remove some noise, and keep signals at a comfortable level.  Play around with the ATT on a hot band, and see where you like it.  Use it in conjunction with the RF Gain, as outlined in Trick #8, below.

Trick #1:   Menus 099-102

These settings allow you to add a low or high cut to the received audio signal.  They may seem similar to the WIDTH knob function, which can be affected by these, but they're not the same.  Cutting the top or bottom of the 099 SSB LCUT and 101 SSB HCUT are really useful if you want to reduce hiss on a noisy day, or lay the foundation to pop-out a tight little DX signal.  You can also widen them out, if you want to listen to a really beautiful eSSB signal as wide as 4000hz.  Play around with them, but removing unnecessary low rumble and high hiss noise are some of the first tweaks I make on a DX signal, as I try to reel them in. I usually leave them on default, or wider than default, until I start hunting for DX. 

For example, if I hear a DX signal with a thin, compressed voice to punch through the noise, I might end up with settings like this to clear hiss above and below the signal:


You'll also note that there are settings like 100 LCUT SLOPE and 102 SSB HCUT SLOPE, where you get a choice between 6dB/oct and 12dB/oct.  This can control how strong the cut is.  Play with them as you like, but I usually leave these two at default, unless I want to really cut noise out of 40m rag chew, and set 101 to around 1900Hz, and 102 to 18db/oct. Try playing with Slope around Menu 120/121, also, if wanting quieter 40m work. Along with adjusting the RF GAIN knob.


Trick #2:  WIDTH knob

The WIDTH knob is useful, and similar to the frequency adjustments we just made in Trick #1.  Try it out, but you will likely find that adjusting the setting between 1800 to default 2400 is good for helping remove some annoying close-in signals, and a bit of extra hiss.  For general listening of strong signals on 40m, I like listening around 2600 to 2800, or even wider on an eSSB signal.  Most of the time, I keep it parked around 2600, until I encounter a tight DX signal.


Trick #3:  SHIFT knob


The SHIFT knob can be useful to tweak the signal just a smidge, so that you hear it "a little better" than you do at default.  Oddly, I find that it often works best just a little to the left, at around -40Hz to -60Hz, on many signals.  This will vary, however.  Move it around until you find you're hearing the signal pop a little more.  From here, we'll pop it even more with some more tricks.


Trick #4:  CONTOUR menu settings

If we long-press buttons, such as the CONT/APF button, you'll notice that we are sent directly to the proper menu setting, without having to hunt for it.  Menu 108 RX DSP CONTOUR LEVEL is a really great one.  About 80% of the time, you'll find you want the 108 CONTOUR LEVEL set high -- between 8 to 11.  I leave it on 10 or 11, to start.  I might boost the snot out of it even higher, once I've tweaked, depending on the signal, which may require additional adjustment of menu 109.  The 109 RX DSP CONTOUR WIDTH seems to work best at 10, but sometimes lowering to 8 will pleasingly shape and remove rushing noise around the signal, as menu 108 is increased.

There can be times when you actually want to create the opposite of a contour, and making a kind of dip, which is caused by going into negative numbers on the 108 CONTOUR LEVEL.  Try it out, and see if/when that might help your ears.

I tend to leave menu 108 and 109 like this, and only hit the CONT/APF button when I need to pop something weak.  I then tweak and adjust as needed.


Trick #5:  CONTOUR knob

You might notice that we're not following the knobs in order, but that's by design.  I prefer to shift first, then hit the CONT/APF button (which I usually leave set as in the above picture), and adjust the CONTOUR knob, then tweak more, as outlined in Trick #4.  Like with the SHIFT knob, we're looking to find where we can best peak the signal a bit more than we heard before.  More often than not, the CONTOUR knob stays in the middle at default, but not always.


Trick #6:  NOTCH for removing hiss (bonus function, besides carrier removal)

The NOTCH is generally thought of as being used to remove an annoying carrier or noise bothering our signal.  But did you know that a neat trick is that you can also use NOTCH to remove some of the hiss next to a signal, once you've made some strong CONTOUR boosts in menu 108?  The nice thing about this is the NOTCH knob is pretty much set and forgotten for this type of trick.  I find turning the NOTCH knob to around 1200 HZ, while leaving menu setting 111 RX DSP IF NOTCH WIDTH to NARROW seems to clear-out some of that rushing noise we've created with the extreme CONTOUR setting adjustments to menu 108 and 109.  Again, all of these NOTCH settings are mostly going to stay set there, unless you need to fiddle with them to remove a bothersome carrier.  Just know that the numbers outlined here can help remove some rushing sound brought on by extreme CONTOUR.  Just hit the NOTCH button to employ the settings, as needed.


Trick #7:  Menus 105 and 106, LSB and USB RX CARRIER

Remember earlier when I said I owned an Icom 7300?  Many of the Icom rigs have Twin PBT knobs, which are very useful for shifting the passband around to highlight a signal.  I always felt the Yaesu rigs were missing this, or only had half of it, given that they had just a SHIFT knob.  Luckily, I recently found menu items 105 and 106.  Choose the correct one for the side band you are using (USB or LSB) and you've found the other half of the Twin PBT.  Adjusting these can clear up more hiss, and help a signal pop even more!  These are very dependent on signal, so choose the correct side band and set as needed and change per the signal you are on (note that adjusting LSB when receiving USB does nothing, and visa-versa).  This adjustment is very powerful!


Trick #8:  RF/SQL (RF GAIN) Adjustment, and AGC Slope

Not as many hams make use of the RF Gain adjustment these days, and it's a shame, because with some rigs, you can really boost a DX signal this way (as outlined in the 2nd paragraph, below).  First, make sure your menu item 036 GENERAL RF/SQL VR is set to RF,  which is the default.  After that, you are free to use the RF/SQL knob to adjust the RF Gain.  Use this by backing it up right until the signal gets just a little quieter, so that some of the extra hiss is removed from the signal.  

You also have the opportunity to add AMP1 or AMP2 in the IPO, and then unlock the AGC (Auto Gain Control) for maximum signal boost.  An important note is that the AGC can be turned off entirely, by a long-press of the white AGC button.  From there, you can "ride the RF Gain" manually, which may be to your liking.  This can be used to great effect on some older rigs, especially.  It also made for a lot more signal boost on my former Icom 7300 -- not as much of an advantage over the typical SLOW/FAST/MID AGC choices that Yaesu gives you with the FTDX3000, when you press the white AGC button.  You will soon learn, however, that running the AGC OFF makes a pretty nasty noise if you suddenly encounter a strong signal booming-in on DX that you have boosted the gain on, in an attempt to strain and hear it!

004 AGC AGC SLOPE is a menu item that can help you remove a bit of noise around a signal, so play with this and see which one you like.  It can also effect how loud a signal is coming in, so keep that in mind.  I am finding it can be more pleasing to change it to SLOPE on a rag chew, but it can cause a weaker signal to be lost, a bit.  Personally, I find that simply adjusting the RF Gain manually can achieve nearly the same effect, without having to go into the menu to change this item.

Lastly, you also have options to tweak 001 AGC FAST DELAY, AGC 002 MID DELAY, and 003 AGC SLOW DELAY, if you like.  One tweak you might like is to change the AGC SLOW DELAY to about 3000 or 3500, from the long default of 4000.  This will affect how long it takes for the AGC to recover after a quick blip of interference. Sometimes it's annoying to wait a long time for the AGC ramp back up, after that.  I mostly leave the other AGC settings alone, but you might find some happy medium adjustment for your liking.


Trick #9:  Menus 120 and 121, HF SSB SHAPE and SLOPE

I'd like to mention that you can play with the 120 RX DSP HF SSB SHAPE and 121 RX DSP SSB SLOPE menu items, if you wish.  I mostly leave them at default, personally.  They do change the sound of the audio, so they are worth mentioning.  You might find one setting more pleasing than the other.  Menu 121 seems to affect that "rushing sound" we hear, so choose one of the 3 choices that is to your liking, on a particular signal, if you care to tweak.  This item also seems to weaken audio punch response if you choose STEEP, and make for a more forward punch to the sound, if you choose GENTLE.

.

Trick #11:  Additional notes on NB, NBW (Noise Blocking)

The FTDX3000 has fairly decent Noise Blocking ability.  Consequently, it's one of those settings best left OFF, until you need it.  The use of it is properly outlined in the Yaesu manual that came with your radio, so no need to get into great detail, here.  Long-press the white NB button, then hit SELECT and adjust with your CLAR/VFO-B knob.  First try NB, to see if it clears up noise, then NBW for wider noises that NB might not cover.  See the Yaesu manual for more info.


Trick #12:  Using the Noise Reduction

The DNR (Dynamic Noise Reduction) on the FTDX 3000 is pretty amazing.  That said, after other adjustments, you may find your signal to be cleaner without it.  Again, the Yaesu manual explains it pretty well, but to turn it on, you need to be viewing the bottom screen menu, after pushing SCOPE as many times as needed.  Use the arrow keys to highlight DNR, and SELECT to toggle on or off.  You can change the intensity of the DNR by long-pressing this SELECT button while DNR is highlighted, which will take you to menu item 110 RX DSP DNR LEVEL.  Use your CLAR/VFO-B knob to adjust per your liking.  Experiment on various signals, at various levels, to your liking.  Some of the really high levels might seem overbearing (and usually are) but can sometimes hit just that right profile to pull out a weak signal.

In Conclusion...


I hope these tips and tweaks for the Yaesu FTDX 3000 help you improve your signal reception.  Generally, I set the menus as mentioned above, and find myself adjusting Menu items 99 to 110 the most, for SSB signals.  I'll be the first to admit the the FTDX 3000 is not a very ergonomic machine, but setting it up correctly before use, and familiarizing yourself with its many menu functions makes things a lot easier.  I may be adding a video example below in the coming weeks, so check back and look for it!  In the meantime, you might also be interested in how to tweak the MH-31b hand microphone TX to a pleasing sound. This page is for the FT-891, but the stock mic is the same as the FTDX 3000, and so are the same equalizer settings.  Enjoy!


Thursday, September 6, 2018

G0NVT PB213 Straight Key Review


I received my G0NVT PB213 LTSLC straight key, serial 163, today. It was shipped directly by the maker. Here is a review by a CW novice with less than 1 month of experience. I am the type who likes to give a deserving piece of work high marks, then spend great detail nit-picking tiny details people may/may not care about, so keep that in mind.  I highly recommend this key, so please understand that, and I give this key a 4.9 out of 5.


Pros: 

 It is highly adjustable, and can be made a very smooth sender. It has a really wide adjustment range, and if you are a light tapper, you can surely develop a lot of feel. If you want, you can make smooth dits and dahs even at a ridiculously light tolerance. You can also set it up if you like pounding it a bit, making it click with the distance between contacts. The spring tension could be a bit tighter for those who like to pound, as I feel I am setting right on the edge of the max range of tightness, when setting up for that. This isn't bad, as it's quite easy to just tighten to max and just back off a bit, to reach the setting I want. One could probably shorten the spring, if they cared to. It works.

There is one more adjustment than I am used to, for "pressure on the contact." I initially couldn't figure out what this did, but when set really loose, it will add some "bounce" to the key as you send. That's interesting, and really makes it impressive. I'm finding I prefer setting it up for a light touch, as I've seen others do in videos. It makes for really low-effort keying, and I don't find myself making as many mistakes as I would with my old Bunnell key, attempting this setting.

Picture
Phil Boyle, G0NVT crafts each key individually
This key is going to change the way I spend much of my time with CW. I plan to indulge the ability of this key to send clear copy with a feather hand. If I try that with my splendid Bunnell Triumph, I start making mistakes. Light tappers can send quite cleanly with the PB213, and send longer much more comfortably.

The weight built into the bottom of the key is excellent. Phil's creation doesn't move around on the desk. A side note -- to keep things stealth, I like to slide under a square of that super-grip non-slip rubbery material purchased for about $2-$3 at a store like Wal-mart (my father uses it to hold objects like tool boxes down in his truck bed). This adds a minute amount of "feel" and keeps my wife/daughter happy after bedtime, even with my Bunnell Triumph, which I prefer to pound on more than tap.

The key was shipped very quickly. It arrived in Korea from the UK in under a week. Phil was great to deal with.

Cons: If I have a dislike, it's the finish. The PB213 just begs to be used, and used a lot. You'll really like pounding this key, but over time, bumps may show. For a device you're going to want as a daily driver, the piano black finish appears somewhat easily scratched or dinged. The shiny base is more like something that wants to sit on a display shelf, rather than bumped by keyboards and other random desk objects. I recognized this immediately, as there were some light metal shavings (dust, really) that shook loose in shipping.  In very carefully wiping/blowing them away, I actually left faint scratches. Some sort of cover would be a good addition to this key. Or better yet -- a more durable finish for those who aren't planning to put it on display outright. Time will tell if this can be noticed by a glance.

My key arrived with a tiny nick in the upper back corner, which was not from shipping (this key was extremely well packed for safe shipment, in two layers of bubble wrap, and a blow-up wrap). It appears to have happened during the making of the key, or before shipping. It's small enough not to be noticed unless looking for it, but I was a bit sad it arrived that way. This nick revealed a scratch down to the white below, but a light touch with a Sharpie pen made that completely disappear. I am not going to care much about that, because it's pretty minor, and not worth the hassle of complaint. Based on what I have read by other reviews, Phil would take care of me if I bothered.  

I plan to use this key a great deal (it will suffer worse wear on my messy desk). The piano finish is also a bit more dull on one side of the top. I'm going to guess it was smudged a bit while cleaning. It's only noticed if you get up and look at it with your eyes 6 inches away from it in bright light. A Ferrari owner could raise a stink, but at about $200 plus shipping, it's easily forgiven on a straight key that performs like something twice the price.

Next, the chrome is also not altogether "perfect." You have to get very close to notice a bit of clouding here and there, so no big deal, but I thought I'd' mention it. Not noticed at more than 6 inches away.

Lastly, I am not used to a tension adjustment being somewhat free-floating on top. I think it's the type of design with this style of key. Not really a con -- probably my inexperience.

At this price, and quality of send -- I'm not going to care about the cons listed here. I could only dream of having the skills and abilities to make a key this nice. Chalk it up to character, and the fact that these keys are hand-crafted one-by-one.

This key will see a lot of use, and I highly recommend it.  I don't know of anyone who sells this nice of a key at a price just under $200, plus shipping.

Maker's site link, with more photos:  https://g0nvtclassickeys.weebly.com/